I’ve never met Joe Taylor (K1JT), but I’ll confess to having very strong feelings of gratitude toward the man. Let me explain…
Joe developed a series of weak signal communications protocols for radio. Originally for EME (Earth-Moon-Earth) bounce communications, they’ve since found a role in HF communications. The WSJT-X software package allows ham radio operators to use those protocols easily. Available for Windows, Linux, and Mac, it is available here.
If you are, like most hams, antenna constrained and power constrained (100W to a dipole for me, on a city lot), these digital modes are a god-send, because I can barely get people in the next state to hear me on sideband with the declining solar cycle going on.
With WSJT-X, I’ve been communicating around the entire Pacific rim on 50 watts or less, typically much less. Truthfully, it very well might have saved my interest in ham radio, which had largely become an exercise in frustration.
The problem with digital modes was getting started. A lot of hams had posted their settings, but unless you had the same radio, same operating system, same cable, they weren’t always helpful. It took me a few days of tinkering to figure it out, and then I started to try to figure it out from a holistic system perspective. Let me see if I can explain, and maybe that’ll help the next guy.
So, with digital modes, what you are doing is basically sending sounds from your PC through your transceiver out onto the airwaves. Those sounds are picked up at the other end by the transceiver and are routed to the PC on their end and (digital tones) converted to text.
The tricky part is two-fold, (1) controlling the transceiver from the computer, and (2) getting the sound in and out of the transceiver. Basically there are two things going on here that you have to figure out.
The first thing you have to do, is get drivers onto your PC that control the sound card included in most modern radios. Fortunately, most modern radios use the same sound card chip! I’m going to walk you through the steps needed to set this up on several transceivers.
Want to give it a try?
First, install the driver and get a USB cable:
- You need to install the driver for the Silicon Labs CP210 USB-to-UART bridge, which is what provides a way of communicating with the USB-B port on the back of the radio. You can download that here. Do this before you do anything else! You can get it here for the Mac or Linux, or you can get it from your radio manufacturer’s site for Windows.
- You need a USB cable A-Male to B-Male for most digitally enabled radios. USB 2.0 is important. I like the Tripp Lite USB 2.0 Hi-Speed A/B Cable with Ferrite Chokes (M/M) in the 6-ft length they sell on Amazon for under $10 here. Be sure and check your computer and your radio though. Newer Macs use USB-C for the computer side, and some radios (IC-7100) have a mini connector on the radio side.
Second, you need to setup your transceiver for computer control. This mostly consists of changing settings to (1) enable the usb port and (2) set the baud rate for communications.
I’m going to suggest here that you save your current settings, then do a factory reset so that your current settings don’t mess up these settings and leave you with a debugging issue.
For the Icom IC-7100:
- DATA MOD should be set to USB
- CI-V Baud Rate should be set to 19,200
For the Icom IC-7200:
- DATA MOD should be set to USB
- CI-V Baud Rate should be set to 19,200
For the Icom IC-7300:
- DATA MOD should be set to USB
- CI-V Baud Rate should be set to 19,200
For the Icom IC-7410:
- DATA MOD should be set to USB
- CI-V Baud Rate should be set to 19,200
Seeing a pattern here? OK, so what does this do? It enables the USB port ONLY when the radio is set in DATA mode, and sets the communications baud rate (the speed at which the computer talks to the radio). Why do we care about that? Because if we set it up this way, you can still use the microphone when you are not in data mode for SSB calls.
Third, you need to route the sound to and from the PC/Transceiver, AND you need to set audio levels so that you don’t over drive the radio.
For the Icom IC-7100:
- ACC/USB Output Select should be set to AF
- ACC/USB AF Level should be set to 50% (just to start, we may adjust this)
- USB MOD Level should be set to 25% (just to start, we will adjust this)
For the Icom IC-7200:
- DATA set to On.
- USB LEVEL should be set to 50% (just to start, we will adjust this)
For the Icom IC-7300:
- ACC/USB Output Select should be set to AF
- ACC/USB AF Level should be set to 50% (just to start, we may adjust this)
- USB MOD Level should be set to 25% (just to start, we will adjust this)
For the Icom IC-7410:
- USB MOD Level should be set to 50% (just to start, we will adjust this)
- DATA set to On.
OK, so what does this do? On the 7100/7300, we select the output for AF, which takes the audio after it has passed through the radio’s filters and is at the audio stage, and routes it out the USB cable to the computer. On the 7200/7410 AF is the only option (there is no IF intercept option on these). On the 7100/7300, the USB AF level is the output level (volume) coming from the radio to the PC. This will determine how saturated the bandscope is on the PC. You’ll want to adjust that so that the scope is dark, with specks of light where the radio signals are received, generally the default is fine and doesn’t need adjusting, but just keep that in the back of your mind. On the 7200/7410, this is fixed, and you can only control through RF gain (wide open usually isn’t a problem). On the 7100/7300 you can also look the the level meter in the lower left corner of the main screen. As long as the meter shows green, audio levels are adequate. If red (high), reduce the AF level, if yellow (low), increase AF level.
The USB modulation level is the critical one, it is the ‘volume’ for the sound coming from the PC (even though it isn’t on the PC, you set it on the radio for the USB sound card in the radio controlled by the PC, just think of it this way). Remember I said we were transmitting sounds? Well that is just like voice. You’ve noticed how when you speak into the microphone in SSB, the power out jumps up and down based on your voice? The same principle applies here.
Here’s where it gets tricky, the WSJT-X software has a “Power” slider (actually volume) that adjusts the volume from the application side, and your PC has an output power slider on the audio device (in this case, the radio sound card) which you can access under the Audio Midi Setup Utility here (two screen shots below). Finally there is the USB Modulation control on the radio. Three volume sliders essentially.
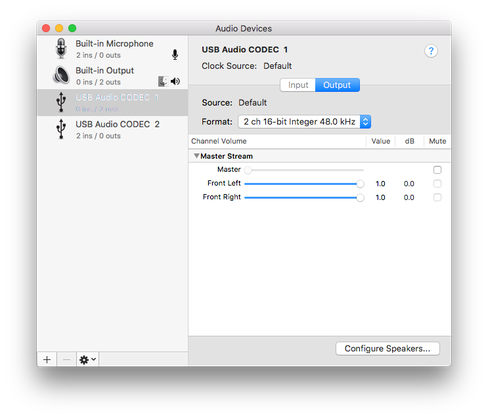
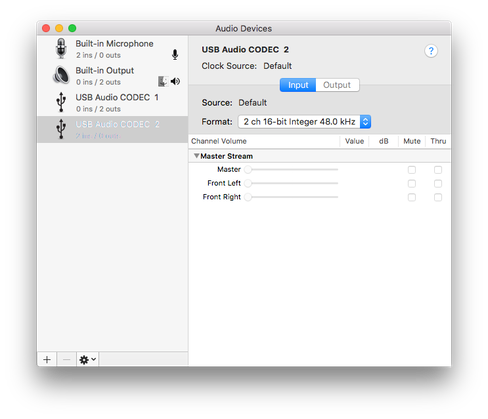
So, you’re kind of playing the radio USB modulation, the WSJT-X power slide, and the Midi (radio usb sound card) (three separate ‘volume’ settings) against the other. Additionally, the transceiver has an ALC that prevents you from over driving the rig somewhat. if you over drive it, you’ll end up either tripping the rig and dumping the audio back to your PC speaker, or creating splatter on the bands. The critical adjustment here is to set this so that the ALC meter on the rig reads just 1 or 2 bars. Some people think it should be zero (which isn’t true). Just get it in as low as possible by adjusting the USB Mod Level (on the 7200 this is the "USB Level" setting). A good way to do this is to set WSJT-X’s power slider to 50% out, and set your PC Audio (Midi) level to 100% out on the USB sound card in the radio (which you access through the PC screen), and then control it all from the USB Modulation (input) on the transceiver side until you are getting 50% power out on the meter. You can do something different later, but this moves you from futzing with three levels to just one level. When operating, watch your power slider and your power out levels. Prolonged operation at high levels can damage your radio and/or your tuner.
Note per the screen shots above that USB Audio (In and Out) should be set to “2ch 16-bit integer 48.0 kHz” in the Midi utility per the WSJT-X manual.
Now you have setup computer control AND audio communications.
Fourth, Since you’re pushing a full signal, I’d suggest setting up your automatic antenna tuner to auto-tune when it encounters a high SWR (greater than 1:1.5) so that you don’t forget to tune when you change bands and inadvertently reflect that full signal back into your finals. I’m assuming you already have a tuner connected and have it working. If your antenna is perfectly resonant, or you have a manual tuner, adjust these instructions accordingly. Be aware of the power limit rating on your auto tuner. LDG only suggests 1/3 of the rated power on theirs for example.
For the Icom IC-7100:
- Tuner (Auto Start) should be set to ON
For the Icom IC-7200:
- Auto Tune should be set to ON
For the Icom IC-7300:
- PTT Tune should be set to ON (Manual doesn’t seem to have an Auto Tune feature)
For the Icom IC-7410:
- Tuner (Auto Start) should be set to ON
By the way, the difference between Auto Tune and PTT Tune is that Auto Tune starts a cycle when SWR is higher than 1:1.5. PTT Tune basically starts a tuning cyle when you’ve changed the frequency by more than 1% regardless of your current SWR. Either setting works, since WSJT-X has set frequencies within each band for each mode (JT65, JT9, FT8, etc.) and a shift from say 40 meters to 20 meters is more than 1%. Even with this set, as always, keep an eye on your SWR while transmitting and implement a manual tuning cycle when needed. This has saved my butt (and my transceiver) a few times.
Fifth, you’ve installed the driver, you’ve installed the cable, you’ve made your radio settings changes, now you need to install the WSJT-X software.
Sixth, you have to configure the software to work with your radio.
OK, I’m a Mac guy (former unix systems engineer who still likes the underlying unix OS on the Mac). Believe me when I tell you this was an inhibitor to finding good information on how to get setup on WSJT-X since all the blogs give you the info for Windows. So, for the Apple lovers out there, herewith are my screen shots for setup with WSJT-X. If you are a Linux guy, these’ll be familiar.
When you first power it up, you’ll get the error message:
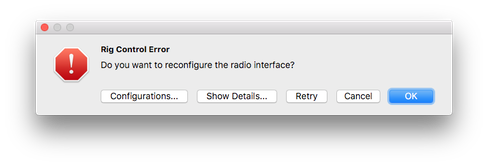
just click “ok” and it’ll take you to the preferences screen. There are three you need to worry about:
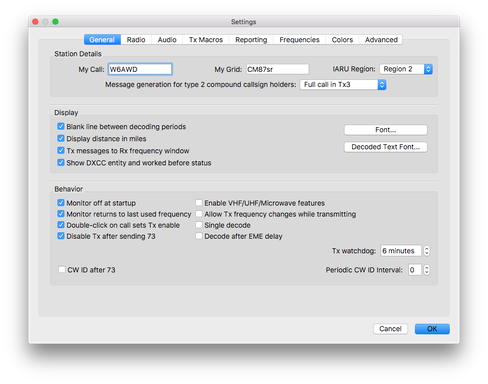
The general screen will allow you to set your settings (call sign, grid, IARU region). I also checked all the boxes on the left. Choose yours according to your taste. You need the stuff in the Station Details section to get going.
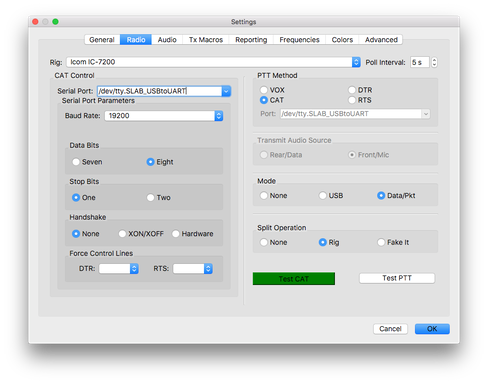
Now the important screen. Select your radio, and select the Serial Port that aligns to the Silicon Labs USB driver (see above), remember we set the baud rate to 19,200 above. Now select 8/1/none on the data bits, leave Force Control Lines empty, and set PTT to CAT, Mode to DATA/Pkt, and Split to Rig. You’ll want to use Data because that is where we set the USB setup. You’ll want to use Rig if your rig supports split. Press “Test Cat” and it should turn green. Press “Test PTT” and it should turn red. Press “Test PTT” again to turn it off. An aside here, you’ll see driver options for /dev/tty.SLAB_USBtoUART and /dev/cu.SLAB_USBtoUART. These are unix terms, TTY is for calling into a system and CU is for calling out of a system. I choose TTY because I tend to see the radio as a system, but the truth is both work.
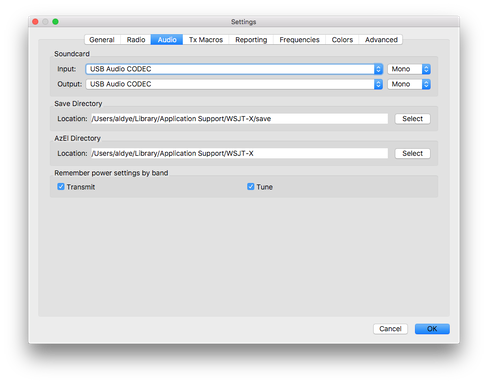
Move to the Audio Tab. Select USB Audio Codec on both input and output.
You’re set. At this point, I suggest you (when doing the setup for the first time) do a reboot and power cycle of the PC and power cycle the radio. Then turn the radio on first, then boot the PC. This’ll make sure the USB audio card can be found by the PC when it powers up. Then re-start WSJT-X.
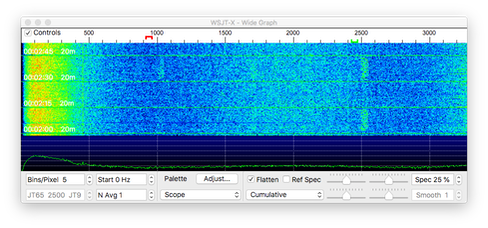
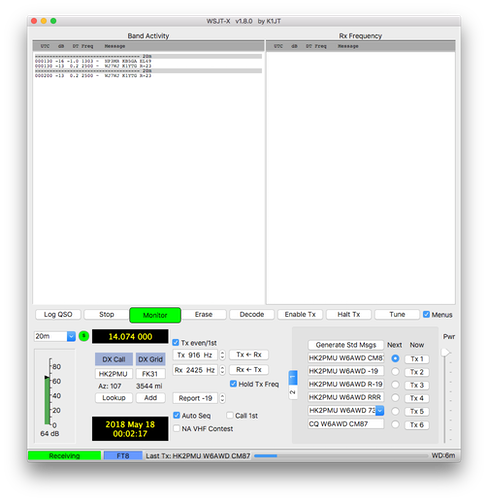
Press the “Monitor” button on the main screen and you should see the scope start moving and calls start showing in the band activity window:
OK. Now a few housekeeping items.
- Make sure you’ve turned off noise blanking, noise reduction, attenuation pre-amps, and anything else that modifies the signal.
- Select the widest filter setting, then open up the filter as wide as it’ll go (3,600 kHz) on the Icom radios. You’re going to be working a band on the scope at least 3 mHz wide.
Now, getting ready to transmit for the first time:
- make sure your radio is connected to the software
- manually run a tuning cycle on the band you are on (just good practice)
- confirm you power is set to 20W out
- turn the volume low, but where you can hear it
- look at the software and confirm that you are receiving in the band activity window. If you aren’t, something is wrong, go figure it out (is your antenna connected?)
- set your meter to ALC. Start a CQ cycle and watch. Is the ALC in the middle or bottom half? Good. If not, press the Halt button on the software, and adjust the USB Modulation Level up or down as needed to get some ALC but not more than half. Try again. When it works, flip over to SWR on the meter and confirm a good SWR, then flip the meter over to Power Out and confirm it is reading 20 watts out (or nearly that). Again, make sure the audio out on the PC is at 100% and the power slide in WSJT-X is at 100%.
Checking that your signal is getting out:
Go to https://pskreporter.info/pskmap.html and enter your call sign and click “go”. It’ll show where your signal is being heard by the reporter network.
Now go read the WSJT-X Manual to understand the different modes and how to QSO. Start with FT8, it is the most popular by far.
Is it real ham radio?
Some hams don’t think this is real ham radio. My view is that it is a lot of fun, and I don’t care whether it is “real”. There seems to be a class of hams who need to feel superior based on age, longevity of license, CW experience, kit building experience, boat-anchor (tubes) experience, etc. Let them feel superior, you just go have fun with WSJT-X. If they don’t like it, they won’t be on the mode anyway, so you won’t have to listen to them complain!
That’s it, hope this helps some of you.
P.S. If you have the IC-7600 or IC-7610, these should be generally applicable to you too, I just don’t have those radios to test. A cursory glance at the manual shows that the IC-7600 has the same settings as the IC-7200 and IC-7410, and the IC-7610 has the same settings as the IC-7300 for enabling the digital interface.